AI Floor Plan to 3D: Turn 2D Plans Into Visual Concepts
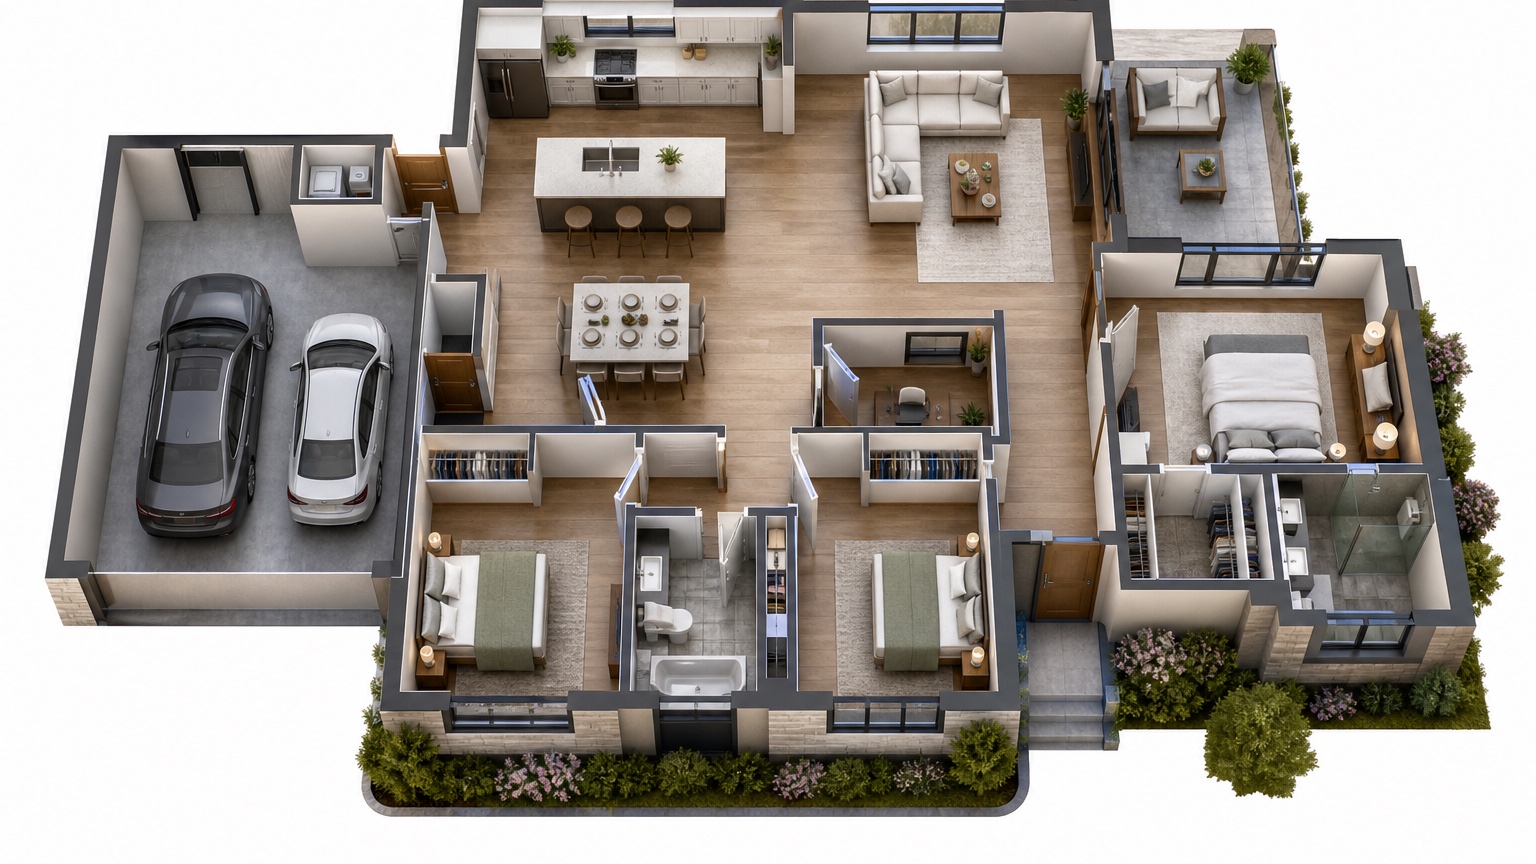
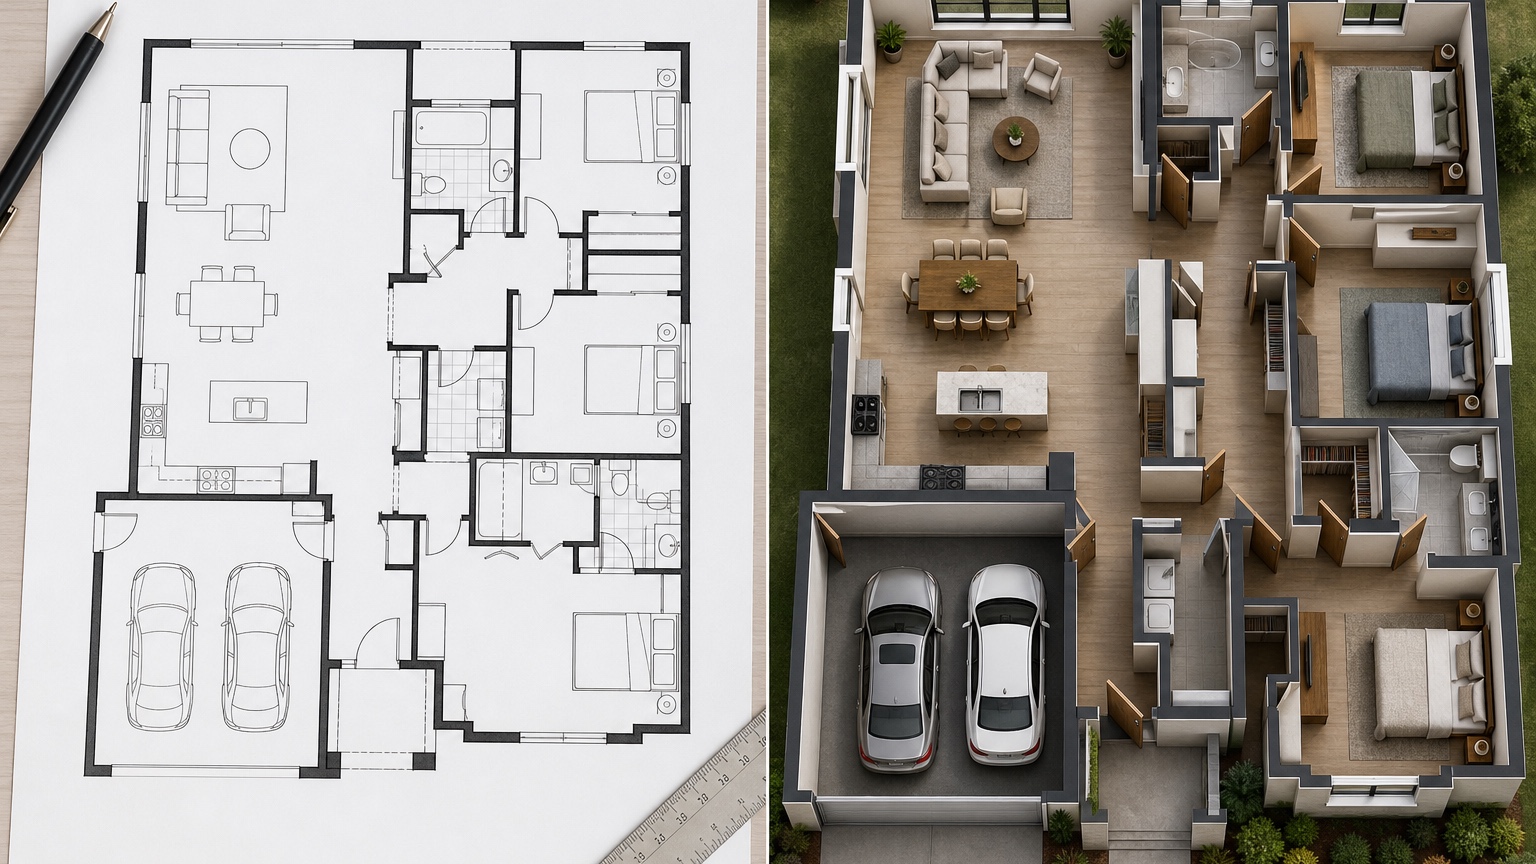
An AI floor plan to 3D workflow helps people understand a plan before the plan becomes expensive. A 2D drawing can be accurate and still feel abstract to a homeowner, investor, or client who does not read plans every week. Walls, openings, room names, and measurements sit flat on the page. The big question is spatial: what will it feel like to move from the entry to the kitchen, look across the living room, or stand under a taller ceiling?
The useful role of AI is translation. It can turn a flat layout into a visual concept that helps the group discuss room adjacency, furniture scale, circulation, daylight, ceiling height, and general atmosphere. It does not replace construction documents, code review, engineering, measured modeling, or professional drawings. Treat the output as a meeting artifact: a way to make the plan easier to understand, critique, and improve.
RedesAIgn can support this early concept stage with 10 AI editors, prompt-based generation, remix and reference images, saved prompts, and history. You can start with 5 free AI credits and no credit card, then buy one-time credit packs if the plan needs more study. Generated images can be used commercially where relevant, which helps architects, builders, designers, real estate teams, and content creators present early ideas, while final building decisions still require qualified review.
Read the floor plan like a story, not a diagram
Before generating a 3D concept, walk through the plan in words. Start at the front door or main entry. Where does the eye go first? Is there a view to a window, a stair, a kitchen island, a hallway, or a blank wall? Then move room by room and describe the transitions. A good AI prompt can use that narrative to preserve the intent of the drawing instead of inventing a prettier but less useful house.
Room adjacency matters because people experience a plan through sequence. A kitchen beside a dining area means serving and cleanup should feel easy. A mudroom next to a garage may need storage and durable flooring. A bedroom near a noisy family room may need privacy considerations. A bathroom door visible from the living area may feel awkward even if it works on paper. Ask the 3D concept to show these relationships clearly.
Circulation is just as important. A plan may have enough square footage but still feel pinched if the route from kitchen to dining crosses behind bar stools, if the entry opens into furniture, or if the primary bedroom path runs through a crowded dressing area. In the prompt, name the intended walking paths: “show clear circulation from entry to living room, from kitchen to dining, and from hallway to bedrooms.”
If your project begins with a real room photo rather than a drawn plan, compare this process with AI interior design from photo. If the plan is mainly about furnishing an empty space, AI empty room design can help translate walls and openings into a more detailed room-level study.
Prepare the 2D plan for visual translation
AI works better when the input plan is legible. Use a clean export or scan with readable labels, clear wall lines, visible openings, and minimal markup. If the plan includes several pages, start with the level or area that needs discussion. A whole-house plan can be useful for adjacency, but a kitchen-living-dining zone may need its own focused concept.
Remove notes that do not help the visual task. Structural callouts, revision clouds, fixture schedules, and dense dimensions can confuse the image if they dominate the plan. Keep the information that affects spatial understanding: walls, doors, windows, stairs, built-ins, ceiling notes, major furniture, room names, and any fixed features.
If ceiling heights vary, write them in the prompt. A vaulted living room, lower hallway, dropped soffit, double-height entry, or sloped ceiling changes the mental model more than a wall color does. Do not rely on the AI to infer height from a flat drawing. Say, for example, “show a 10-foot flat ceiling in the kitchen and an open 14-foot vaulted ceiling in the living room.”
Furniture scale deserves similar attention. If the plan shows a 96-inch sofa, eight-person dining table, king bed, island stools, or home office desk, mention those pieces. If furniture is not drawn, describe likely scale. AI images are not measurement tools, but scale language helps prevent fantasy rooms that fit too much furniture in too little space.
Prompt for spatial facts first, style second
A floor-plan prompt should begin with the facts that must survive. Style can come later. If the first instruction is “make it luxury modern,” the image may chase finishes and ignore adjacency. If the first instruction is “translate this plan into a realistic 3D interior concept while preserving walls, openings, room sequence, ceiling heights, and furniture scale,” the output has a better chance of explaining the plan.
Try a prompt like this for a residential layout: “Use this 2D floor plan to create a realistic 3D visual concept. Preserve the room layout, wall positions, door and window locations, stair location, kitchen island, and circulation paths. Show the relationship between entry, living room, kitchen, dining area, hallway, bedrooms, and bathrooms. Use warm contemporary finishes, believable furniture scale, and natural daylight. This is a concept visualization, not a construction drawing.”
For an open-plan area, be more specific: “Translate this kitchen, dining, and living floor plan into a 3D concept from a viewpoint near the entry. Keep the island centered as drawn, show the dining area adjacent to the kitchen, keep the living seating facing the fireplace wall, and maintain a clear walkway behind the stools. Use simple materials so the layout is easy to read.”
For a homeowner review, ask for labels or clarity rather than drama: “Create a clean 3D concept that helps non-technical viewers understand room adjacency and circulation. Make walls, openings, windows, furniture zones, and ceiling height readable. Avoid unrealistic decor, oversized furniture, or invented rooms.”
Reference images can guide tone without replacing the plan. Upload a material mood board or interior reference and write, “Use the reference for palette and material feeling only; preserve the uploaded floor plan layout.” RedesAIgn’s reference image workflow is helpful here because the plan remains the anchor while the reference adds visual language.
Use 3D concepts as meeting artifacts
The strongest reason to convert a floor plan to 3D is not to impress the room. It is to make the meeting more productive. A flat plan can lead to abstract feedback: “I am not sure about the kitchen,” or “the living room seems small.” A visual concept invites more useful comments: “the island stools block the path,” “the dining table feels too close to the slider,” or “the hallway view needs a better focal point.”
Bring the 3D concept into the meeting with a short agenda. First, review room sequence. Second, review circulation. Third, review ceiling and volume. Fourth, review furniture scale. Fifth, review mood and finishes. This order keeps the conversation from jumping straight to cabinet color before the layout is understood.
For homeowners, the visual can reduce anxiety. Many people approve a plan because they trust the professional, not because they can imagine the space. A concept view gives them language. They may realize the pantry door is in a good spot, the family room feels more open than expected, or the bedroom entry needs more privacy.
For architects and builders, the concept can identify misunderstandings early. If a client sees a 3D view and says, “I thought that wall was open,” the issue can be clarified before field changes. If a designer notices that furniture scale makes a walkway tight, the team can revisit layout, not blame the finished room later.

Compare variations without losing the base plan
Iteration is useful only if the plan stays stable. Use remix rounds to change one category at a time. Start with a baseline translation. Then create a furniture-scale version, a ceiling-volume version, a daylight version, and a finish-mood version. If every remix changes walls, windows, furniture, ceiling, and style at once, it becomes hard to tell which decision improved the plan.
Saved prompts and history are valuable for this exact reason. Save the prompt that best preserved the floor plan, then remix from that version. If a later image invents a larger window or shifts a doorway, return to the stable prompt instead of trying to repair every error. Naming versions also helps meetings: “baseline adjacency,” “larger dining table test,” “vaulted ceiling study,” and “warmer material study” are easier to discuss than unlabeled images.
Use reference images when you want controlled variation. One reference can test a lighter Scandinavian palette. Another can test richer transitional materials. Another can test a more minimal furniture plan. Keep the same layout instructions in every prompt so the comparison remains about mood, not accidental geometry.
If the project moves from layout understanding into room styling, link the next step to a more focused workflow. AI room design generator can help study a specific room after the plan is accepted, while AI furniture visualizer is better for checking individual sofas, tables, chairs, or beds against the concept.
Know what the concept cannot prove
A 3D concept can make a plan easier to understand, but it cannot verify the plan. It should not be used as a substitute for architectural drawings, structural design, code compliance, accessibility review, fire separation, energy requirements, waterproofing details, mechanical coordination, or permit documentation. If the image looks buildable, that does not mean it is buildable.
It also cannot guarantee dimensions. A sofa may look like it fits while the actual walkway is too narrow. A dining table may appear comfortable even if the chair clearance is short. A stair may look elegant while the real rise, run, guard height, and headroom need technical review. Keep measured decisions in the drawings and specifications.
Materials need caution too. AI may make stone, wood, tile, lighting, and millwork look coherent without specifying products, cost, lead time, installation method, or maintenance. Use the concept to align on direction, then translate decisions into samples, quotes, drawings, and schedules.
The safest language in client or homeowner communication is clear: “This image is a visual concept based on the floor plan. It is intended to support discussion about layout, adjacency, circulation, scale, and design direction. It is not a construction document.” That sentence protects the role of the image while still making it useful.
Turn the visual into next-step decisions
After the meeting, do not leave the 3D concept as a pretty artifact. Convert reactions into decisions. If the circulation feels tight, mark the plan area that needs review. If the ceiling volume feels right, keep that note. If the furniture looks too large, measure alternatives. If the client prefers the warmer material direction, save the prompt and reference images for later design work.
A simple follow-up list works well: confirmed, revise, test, and verify. Confirmed might include room adjacency, island orientation, living room focal point, and bedroom privacy. Revise might include hallway width, dining table placement, mudroom storage, or window alignment. Test might include ceiling beams, built-ins, furniture sizes, or material palettes. Verify belongs to the professional team: code, structure, MEP, cost, and constructability.
RedesAIgn fits this early loop because you can create the first plan translation with free credits, save the strongest prompt, remix targeted variations, and keep a history of the visual discussion. Use it when the flat plan needs to become a shared spatial model in people’s minds. Then hand the decisions back to drawings, measurements, and qualified professionals.