AI Blueprint to 3D Model: Visualize Layouts Before Building
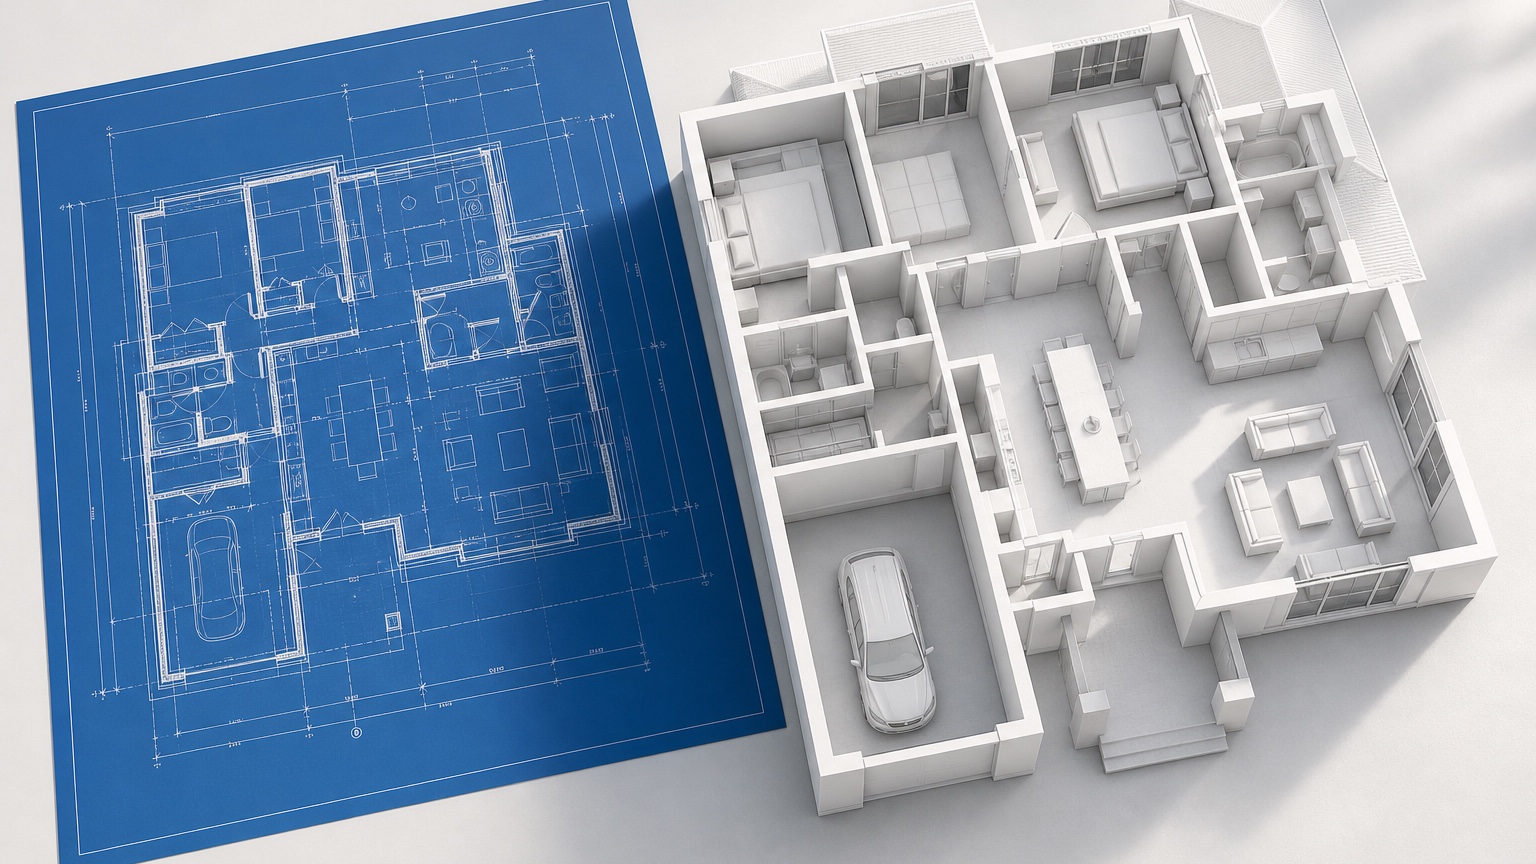
An AI blueprint to 3D model workflow can help a project team see the same layout before framing, finishes, and field decisions make changes costly. Builders and designers often read blueprints fluently, but clients, owners, sales teams, and trade partners may not. They may understand room names and dimensions while still missing how the entry opens, how the kitchen relates to the family room, or how a ceiling transition will feel.
The goal is preconstruction alignment. A model-like AI concept can turn flat plan information into a visual discussion piece for layout readability, revision notes, massing, materials, and client walkthroughs. It is not a BIM model, a permit drawing, a shop drawing, or a source of measured quantities. It is a bridge between technical documents and shared understanding.
RedesAIgn is useful for this concept stage because it supports 10 AI editors, prompts, remix and reference images, saved prompts, and history. Teams can start with 5 free AI credits and no credit card, then use one-time credit packs when a plan needs more comparison rounds. Generated images can be used commercially where relevant, including design presentations and builder communication, while construction still depends on professional documentation, codes, engineering, pricing, and field coordination.
Start with the communication problem
A blueprint can be technically correct and still fail as a communication tool. The issue may be that the client cannot picture the kitchen volume. It may be that a designer wants to show why a wall revision matters. It may be that a builder needs a cleaner way to discuss stair placement, ceiling changes, or exterior massing with someone who does not read plan sets.
Before creating a 3D concept, name the specific communication problem. Are you explaining an open-plan living zone? Testing whether a hallway feels too long? Showing how a covered patio connects to the main room? Clarifying a primary suite layout? Comparing two elevation ideas? The prompt should be built around that goal rather than asking for a general conversion.
A focused prompt prevents the AI from turning the blueprint into a decorative image with little project value. “Visualize the kitchen, dining, and great room for a client walkthrough, keeping the blueprint layout and showing circulation from the garage entry to the island and patio doors” is stronger than “make this blueprint 3D.”
For a plan-centered homeowner explanation, AI floor plan to 3D is the closest companion workflow. If the team later needs room-specific design options, AI room design generator or AI interior design app can help develop interiors after the layout conversation is settled.
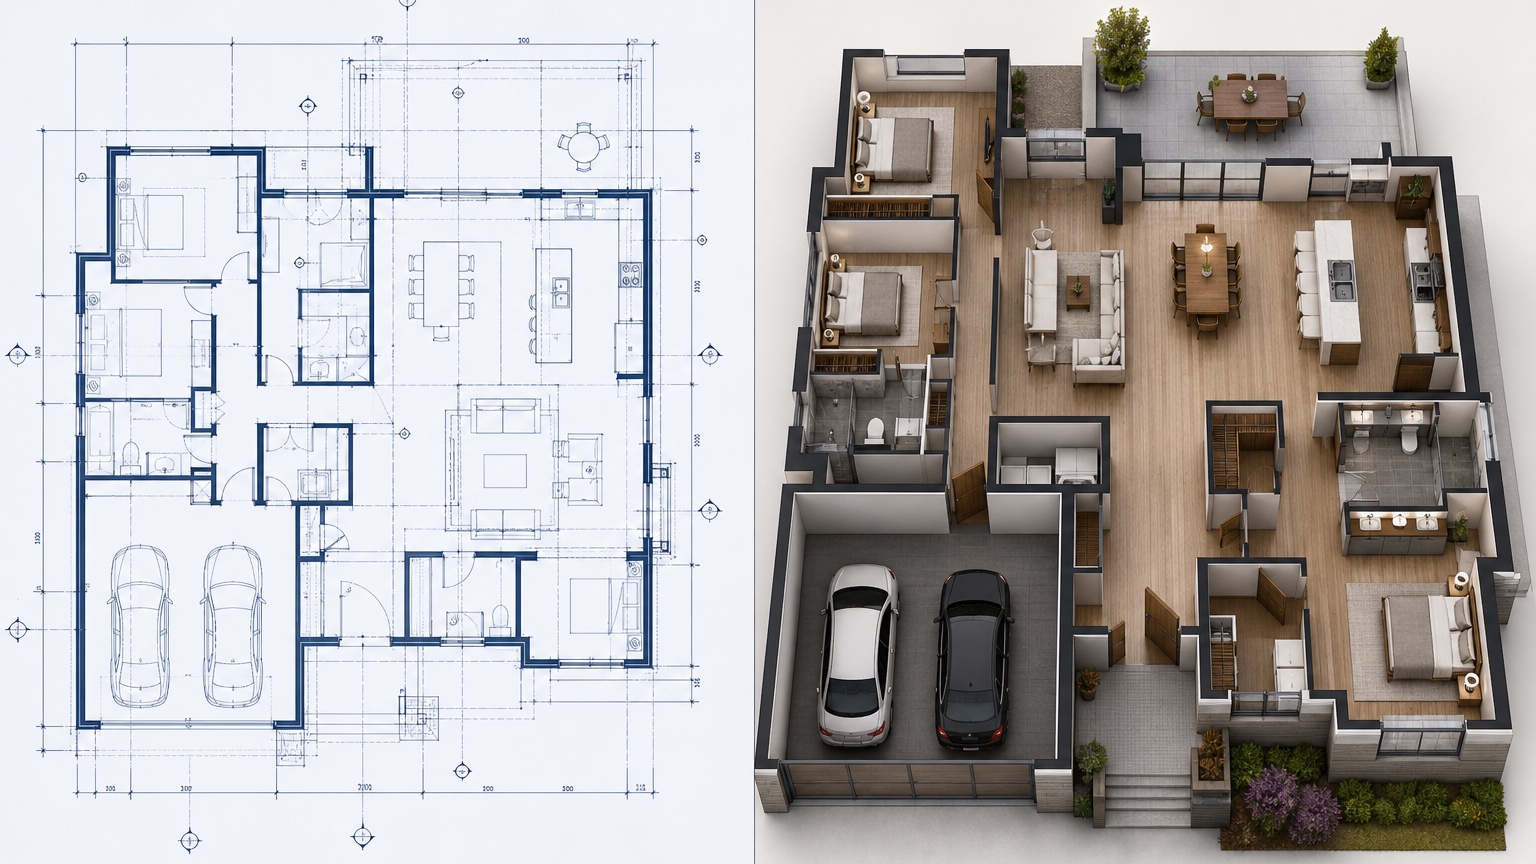
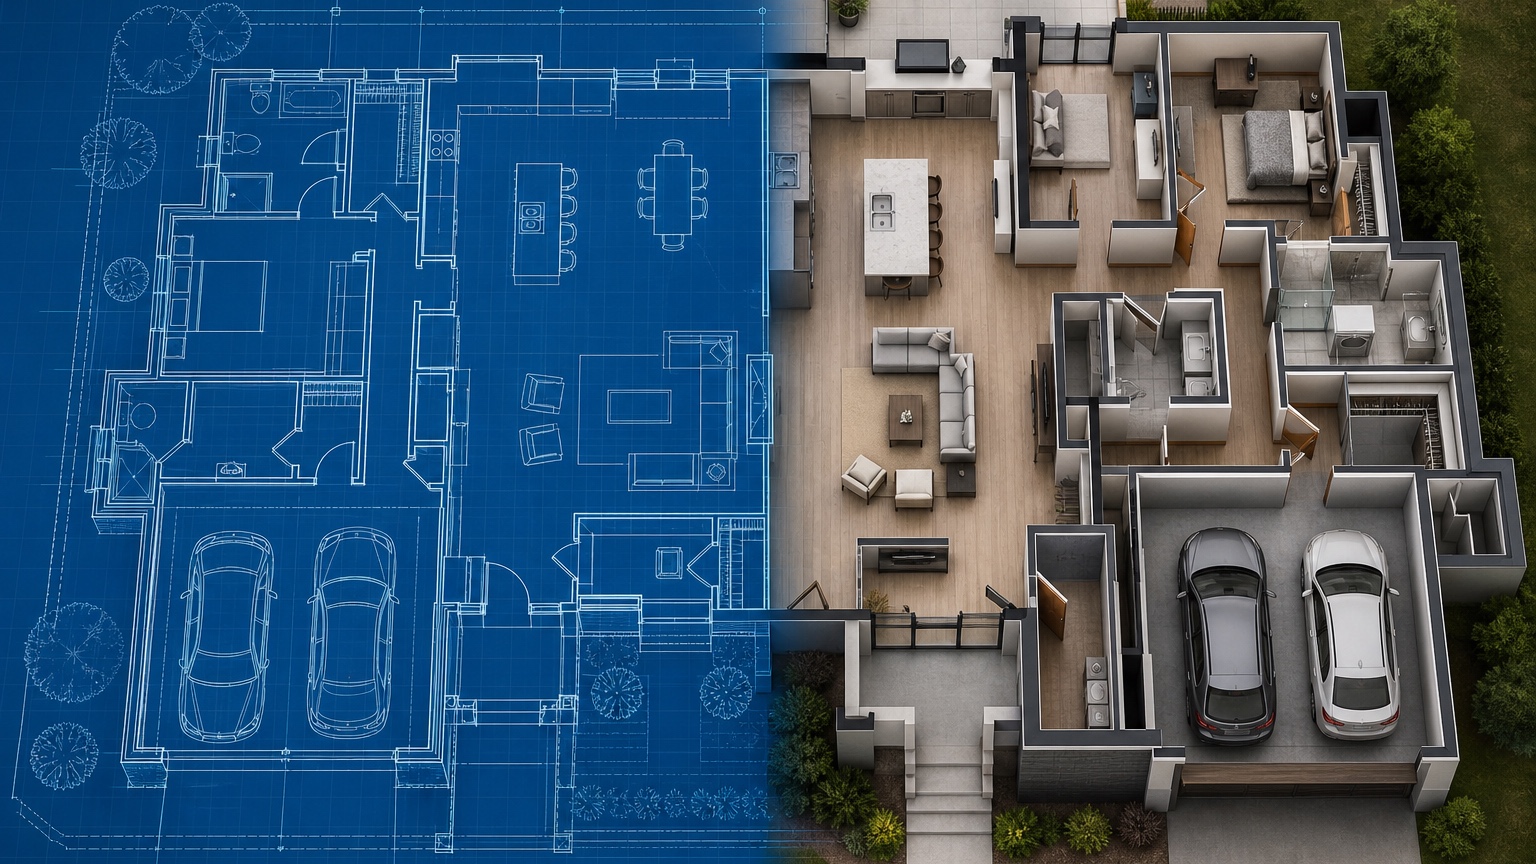
Clean the blueprint before asking for a concept
Blueprints contain many layers of information. Some are essential for a visual concept; others are not. A dense sheet with structural notes, schedules, dimensions, legends, keynotes, electrical symbols, and revision clouds may be useful to the team but noisy for image generation. Use the cleanest view that still carries the spatial facts.
For interior layout visualization, prioritize walls, openings, room names, stair direction, ceiling notes, built-ins, plumbing fixtures, kitchen cabinetry, islands, fireplaces, major windows, and door swings. If the sheet has heavy technical annotations, crop to the relevant area or provide a simplified plan export.
For exterior or massing concepts, include elevation references if available. A plan alone may not explain roof form, porch depth, window proportions, cladding breaks, or garage mass. If you have an elevation, rendering, material board, or precedent image, use it as a reference and state its purpose clearly.
Revision notes should be explicit. If the team is testing a change, write it in plain language: “Show the revised plan with the pantry door moved to the mudroom wall,” or “Compare the original fireplace wall with a wider opening to the dining area.” Saved prompts and history in RedesAIgn help keep these versions organized so the team can return to the exact wording used for each revision.
Build the prompt around blueprint readability
The first job is to preserve the blueprint’s intent. That means naming the elements that cannot move. A good prompt says what to keep, what to emphasize, what to simplify, and what the image is for. Treat it like a short design brief for a visual assistant.
For an interior client walkthrough, try: “Create a realistic 3D model-like concept from this residential blueprint. Preserve wall locations, room adjacencies, door and window openings, stair location, kitchen island, fireplace wall, and major built-ins. Show the view from the entry toward the kitchen, dining, and great room so a client can understand layout and circulation. Use simple warm materials and avoid changing the plan.”
For a builder-designer revision review, try: “Visualize this revised blueprint area as a clean preconstruction concept. Focus on the mudroom, pantry, kitchen, and garage-entry circulation. Keep door swings, cabinetry locations, island position, hallway width, and storage zones readable. Use neutral finishes so layout changes are easy to discuss.”
For an exterior massing study, try: “Use the blueprint and elevation reference to create a model-like exterior concept. Preserve roof massing, garage position, porch depth, window rhythm, and entry location. Apply the reference material palette to siding, trim, stone, roofing, and door color, but do not invent a different house shape.”
Include caveat language inside the prompt when needed: “This is a conceptual visualization for preconstruction communication, not a measured 3D model.” That instruction can also appear in the image notes, client deck, or meeting summary so nobody confuses the concept with a technical deliverable.
Use materials as references, not promises
Materials are where blueprint-to-3D concepts can become persuasive too quickly. A warm oak kitchen, perfect stone fireplace, bright windows, and elegant lighting can make a layout feel approved even before products, pricing, and details are verified. Use material references to guide discussion, not to imply final selections.
If the goal is layout clarity, keep finishes simple. Ask for neutral cabinetry, plain walls, simple flooring, and modest lighting. This keeps attention on room proportions, circulation, and built-in placement. If the goal is client excitement, a richer material concept may be appropriate, but label it as inspiration.
Reference images work well when each one has a narrow job. One image can guide cabinet tone. Another can guide exterior siding and trim. Another can guide fireplace material or stair railing style. In the prompt, write: “Use the references for material direction only; preserve the blueprint layout and do not copy unrelated room shapes.”
For commercial use, the workflow can support presentations, listings, concept decks, and stakeholder updates where relevant. Still, the builder or designer should translate any selected direction into real products, specifications, budgets, procurement timelines, installation details, and warranty considerations.
Turn concepts into a walkthrough sequence
A single hero image may be enough for a social post, but preconstruction alignment often needs a sequence. Think like a walkthrough. Start outside or at the entry, then move through the spaces in the order a client will experience them. Each image should answer one layout question.
For a home interior, the sequence might be: entry view into the main living area, kitchen island and dining relationship, great room ceiling and fireplace wall, mudroom connection from the garage, primary suite path, and covered patio connection. You do not need all of these for every project. Choose the views where misunderstanding would be expensive.
For a builder-client meeting, label each concept with the blueprint question it answers. “View 1: entry sightline,” “View 2: kitchen circulation,” “View 3: pantry revision,” “View 4: living room ceiling volume.” This keeps feedback practical. The client is not judging an isolated image; they are reacting to a decision point.
A client walkthrough should also include what is unresolved. If window sizes are schematic, say so. If lighting is illustrative, say so. If millwork details are not final, say so. This honesty makes the concept more trustworthy. It shows that the image is part of the process, not a shortcut around documentation.
Compare revisions with controlled variables
Blueprint revisions can become confusing when the visual style changes at the same time as the layout. If option A has white walls and option B has dramatic wood beams, the client may choose the beams rather than the better plan. Keep visual variables controlled when comparing layout revisions.
For a wall-change comparison, use the same camera angle, same general palette, and same furniture scale. Ask only for the wall or opening to change. For a kitchen layout comparison, keep finishes neutral and compare island orientation, cabinet run, appliance wall, pantry door, and circulation. For an exterior massing comparison, keep material palette stable and compare roof, porch, or window rhythm.
RedesAIgn’s remix workflow can help because you can begin from a strong baseline and ask for targeted changes. Saved prompts and history make it easier to document what changed: “Version B widened the opening between dining and living,” or “Version C used the same plan with a lighter exterior palette.” This record is useful when a meeting produces several rounds of feedback.
Revision notes should be short and visible. After each concept, write one sentence: what changed, why it changed, and what still needs verification. For example: “Moved pantry access toward the mudroom to reduce kitchen traffic; verify door swing, shelving depth, and framing.” The image creates understanding; the note turns that understanding into action.
Keep construction authority in the documents
A model-like AI image can look more complete than it is. That is why the team needs firm boundaries. Blueprints, specifications, engineering, code review, shop drawings, schedules, contracts, and field coordination remain the authority. The AI concept is a communication layer on top of those documents.
Do not use the concept to estimate exact quantities, approve structural changes, confirm clearances, verify egress, coordinate mechanical systems, or promise final finishes. Do not assume the AI image has preserved every wall or opening perfectly. Compare it against the blueprint before sharing it, and mark any visible differences.
This review step is especially important for builders. A client may notice a beautiful built-in, beam, window, or lighting feature that was never in the scope. If it appears in the concept, decide whether it is illustrative, optional, or wrong. Add a note before it becomes an expectation.
Designers should also protect their process. If a concept is based on a blueprint plus a material reference, it may be suitable for mood and layout discussion, but detailed design still needs drawings, selections, vendor coordination, and install planning. The image can accelerate agreement, not replace the work behind it.
A practical preconstruction workflow
Use a simple loop: choose the communication problem, clean the blueprint, write a preservation-first prompt, generate a baseline, review against the plan, remix targeted revisions, and summarize decisions. This keeps the AI step useful rather than decorative.
In a builder meeting, the baseline might show the main level from the entry. The first remix might test a kitchen island adjustment. The second might clarify a mudroom storage wall. The third might show an exterior material direction using a reference image. Each output serves the same project conversation, but none pretends to be final documentation.
In a design meeting, the concept can help a client approve direction before detailed modeling or sourcing begins. The designer can ask: Does the room sequence feel right? Is the opening size comfortable? Does the built-in location make sense? Should the material direction be warmer, lighter, quieter, or more dramatic? These questions are easier to answer when the client is looking at a visual version of the blueprint.
RedesAIgn’s 5 free AI credits make it possible to test this workflow without a credit card. If the team finds it useful, one-time credit packs can support more plan areas, more revisions, or more client-ready sequences. The important habit is to keep each image tied to a blueprint question, a revision note, and a next action.
Close the loop after the walkthrough
After the client walkthrough, gather comments while the images are still tied to plan sheets. Sort feedback into four groups: approved, revise, price, and verify. Approved items may include general layout, room sequence, or material direction. Revise items may include walls, openings, cabinetry, storage, or furniture zones. Price items need estimating. Verify items belong to code, engineering, dimensions, vendors, or field conditions.
Then update the working documents, not just the image set. If the concept exposed a layout issue, the blueprint needs revision. If it created a finish preference, the selections process needs a note. If it raised a cost question, the estimate needs review. If it created a client expectation that is not in scope, the team needs to clarify it.
That is the best use of AI blueprint to 3D model work: not a replacement model, but a shared visual checkpoint before building. It gives builders, designers, and clients a clearer way to see the layout, discuss revisions, and align on direction while the real authority remains in the documents that make the project buildable.