AI Bathroom Remodel Visualizer for Tile, Vanity, and Lighting Ideas
An AI bathroom remodel visualizer is helpful when the expensive parts of a remodel are still undecided: tile size, shower surround, vanity style, faucet finish, mirror shape, wall color, lighting temperature, storage, and whether the existing layout should stay. Bathrooms look simple on a mood board, but they are full of constraints. Plumbing walls, door swings, vent fans, outlets, waterproofing, window placement, toilet clearance, and shower dimensions all limit what can actually happen.
For bath remodelers and homeowners, the best use of a visualizer is not to generate a fantasy spa and hope the contractor can build it. The useful workflow is more disciplined: start with a real bathroom photo, name what must remain, compare finishes in controlled rounds, and keep the design close enough to price and discuss. A tile that looks elegant in a showroom can feel busy in a five-foot-wide room. A black vanity can look sharp online but heavy under one ceiling light. Brass fixtures can warm a space or clash with cool gray tile. Seeing combinations in the actual room reduces guessing.
RedesAIgn supports this early comparison stage with 10 AI editors, prompts, remix, reference images, saved prompts, and history. You can begin with 5 free AI credits and no credit card, then use one-time credit packs only if you need extra rounds. That is useful for bathroom planning because one clean source photo can become a practical comparison set before anyone orders tile, schedules demolition, or commits to a vanity size.
Write down the bathroom constraints first
A bathroom remodel usually has less flexibility than a bedroom or living room refresh. Moving a toilet, tub, shower drain, or vanity plumbing can change the project from a finish update to a more expensive renovation. Before using an AI bathroom remodel visualizer, make a short constraint list. Keep it plain: toilet stays, tub becomes shower, vanity stays 36 inches, floor tile can change, window must remain, medicine cabinet must remain recessed, no wall removal, no wet-room conversion, or contractor says drain location should not move.
This list protects the visualization from drifting. If you simply ask for a “modern bathroom remodel,” the image may widen the room, remove the soffit, add a freestanding tub, invent a second window, or replace the toilet location. Those ideas may look better than the existing room, but they do not help you choose materials for the remodel you can actually build.
A stronger first prompt might read: “Use this bathroom photo to preview a realistic remodel. Preserve the room size, door location, toilet location, window, ceiling height, and plumbing wall. Replace the vanity, floor tile, wall paint, mirror, sconces, and shower tile only. Keep the design achievable for a homeowner remodel without moving plumbing.”
If you are planning a larger home update, compare the bathroom process with AI interior design from photo. Whole-room visualization can help with general style, but bathrooms need extra attention to moisture, clearances, and fixed services.
Photograph the bathroom so the tool can read the room
Bathrooms are hard to photograph because they are small, reflective, and often lit by mixed bulbs. Use the most honest photo you can. Stand at the doorway or in the tub/shower opening if safe, keep the camera level, and capture the vanity, toilet, tub or shower, floor, ceiling light, mirror, window, and door swing if possible. Turn on lights, but open a blind or door if daylight improves color accuracy.
Do not worry about making the room look perfect. A clean counter and visible floor help, but the main purpose is to show boundaries. The visualizer needs to know where the vanity ends, how narrow the walking space is, where the shower glass or curtain sits, and how tall the tile currently runs. If there is a low soffit, sloped ceiling, radiator, niche, linen cabinet, or awkward pipe chase, include it rather than cropping it away.
For remodelers, take a second photo straight at the vanity and another toward the shower. Use each view for a different test. The doorway view is good for overall palette. The vanity view is better for mirrors, sconces, counters, and cabinet finish. The shower view is better for tile pattern and niche placement.
Compare tile without changing everything else
Tile often deserves its own round. It affects cost, labor, waterproofing, grout maintenance, slip resistance, and the visual size of the room. Start with a small set of realistic tile families: matte large-format porcelain, warm stone-look tile, simple white subway tile, vertical stacked ceramic, shower-floor mosaic, or a quiet checkerboard floor. Do not compare six tile types while also changing vanity color, wall color, mirror, lighting, and fixtures.
Prompt for tile location. “Use zellige tile” is vague. Better: “Use off-white handmade-look tile on the shower walls only, vertical stack pattern, with a simple warm gray floor tile and painted drywall outside the shower.” Or: “Keep the existing tub location and show 12-by-24-inch matte limestone-look tile on the shower surround, stacked horizontally, with a smaller matching mosaic on the shower floor.” Even when the image is not a specification, location language makes the concept more reviewable.
Also ask for realistic grout contrast. A busy grout grid can make a small bathroom feel chopped up; grout that disappears can make maintenance or installation details easy to overlook. Ask for “low-contrast warm gray grout” or “subtle white grout, not high-contrast black lines” if that is the direction you want to test.
For floors, remember that the image cannot validate slip rating, substrate, waterproofing, transitions, or code. It can help you notice whether a tile tone fights the vanity or whether a pattern overwhelms the room. If flooring is the main decision, AI flooring visualizer is a useful companion because it focuses on plank direction, tile scale, and transitions across spaces.
Test vanity size, storage, and countertop color together
The vanity is both a visual anchor and a daily-use object. A beautiful vanity that blocks a door, leaves no counter space, or lacks storage will become annoying fast. When prompting, state whether the vanity width can change. If the plumbing wall stays and the current vanity is 30 inches, ask for a 30-inch or 36-inch option only if that size is realistic. If you need drawers, say so. If a pedestal sink is charming but impractical for a family bathroom, do not let the image seduce you into losing storage.
Useful vanity prompts include practical details: “Replace the existing vanity with a warm oak floating vanity of the same width, two drawers, white quartz-look countertop, undermount sink, wall-mounted faucet only if plumbing allows, and a simple rectangular mirror.” For a more budget-aware update: “Keep the vanity footprint, show a painted sage vanity front, new hardware, white countertop, and better mirror lighting without moving plumbing.”
Countertop color should be tested with tile and wall color. Bright white counters can look crisp with warm wood and handmade tile, but too stark beside cream tile. Black counters can ground a powder room but show water marks. Warm stone can soften white tile but may clash with cool gray floors. Use the visualizer to narrow the direction, then confirm with samples under your actual bathroom lights.
If you are comparing furniture-like vanities or freestanding storage, the same scale concerns apply to the broader AI furniture visualizer workflow. Bathroom pieces still need measurements, door clearance, and delivery feasibility.
Use lighting previews to avoid a flat or harsh result
Bathroom lighting is easy to underestimate. A remodel can have good tile and still feel wrong if the mirror is shadowy, bulbs are cold, or a single ceiling fixture flattens the room. In a visualizer, test lighting as part of the vanity zone. Compare side sconces, a bar light above the mirror, recessed ceiling lights, and a warmer bulb color. Ask for practical lighting rather than dramatic hotel lighting if the bathroom is used for shaving, makeup, or morning routines.
A prompt might say: “Show a realistic lighting plan with two simple sconces at mirror height, warm white light, a ceiling light preserved, and no dramatic hidden cove lighting.” If hardwiring is not in scope, ask for a design that keeps the existing electrical locations. If the current fixture is above the mirror and the wall cannot be opened, test better bar-light styles rather than sconces that require new boxes.
Mirrors also change the room. A round mirror can soften straight tile and a boxy vanity. A tall rectangular mirror can make a small bathroom feel higher. A medicine cabinet may be non-negotiable for storage. Tell the prompt whether the mirror can change size, whether it needs to include storage, and whether it should align with the vanity width.
Keep fixtures and paint in the same finish family
Faucets, shower trim, towel bars, robe hooks, cabinet pulls, and lighting finishes do not need to match perfectly, but they should look intentional. Use the visualizer to compare chrome, brushed nickel, matte black, brass, and mixed finishes in the actual room. In a small bathroom, too many finish colors can feel accidental. In a powder room, a bolder combination may work because the space is more decorative and less visually cluttered.
Paint should support tile and lighting. Soft warm white, pale greige, muted blue-green, clay, mushroom, or deeper moody colors can all work, but the right choice depends on the tile undertone and natural light. If your tile is cool white, a creamy wall may look yellow. If the vanity is warm oak, a cold gray wall can make it feel orange. Ask for paint tests after the main tile and vanity choices are stable.
For wall-specific experiments, AI wall color visualizer interior can help isolate paint ideas. In a bathroom, however, always bring the paint decision back to tile, mirror light, and fixture finish. A color that looks calm in a bedroom may feel muddy under bathroom LEDs.
Build a remodel comparison sheet your contractor can react to
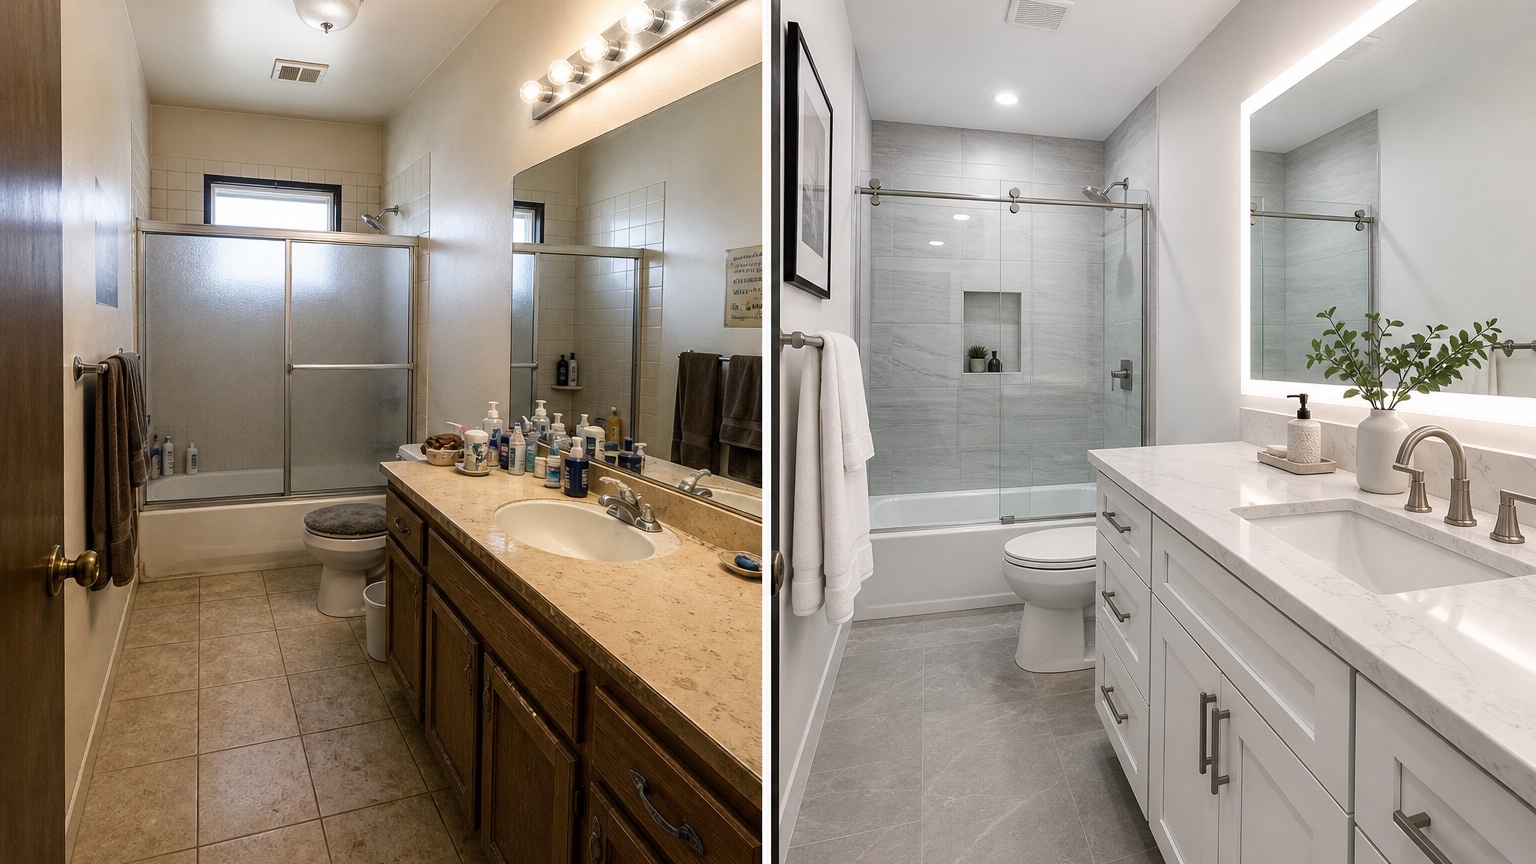
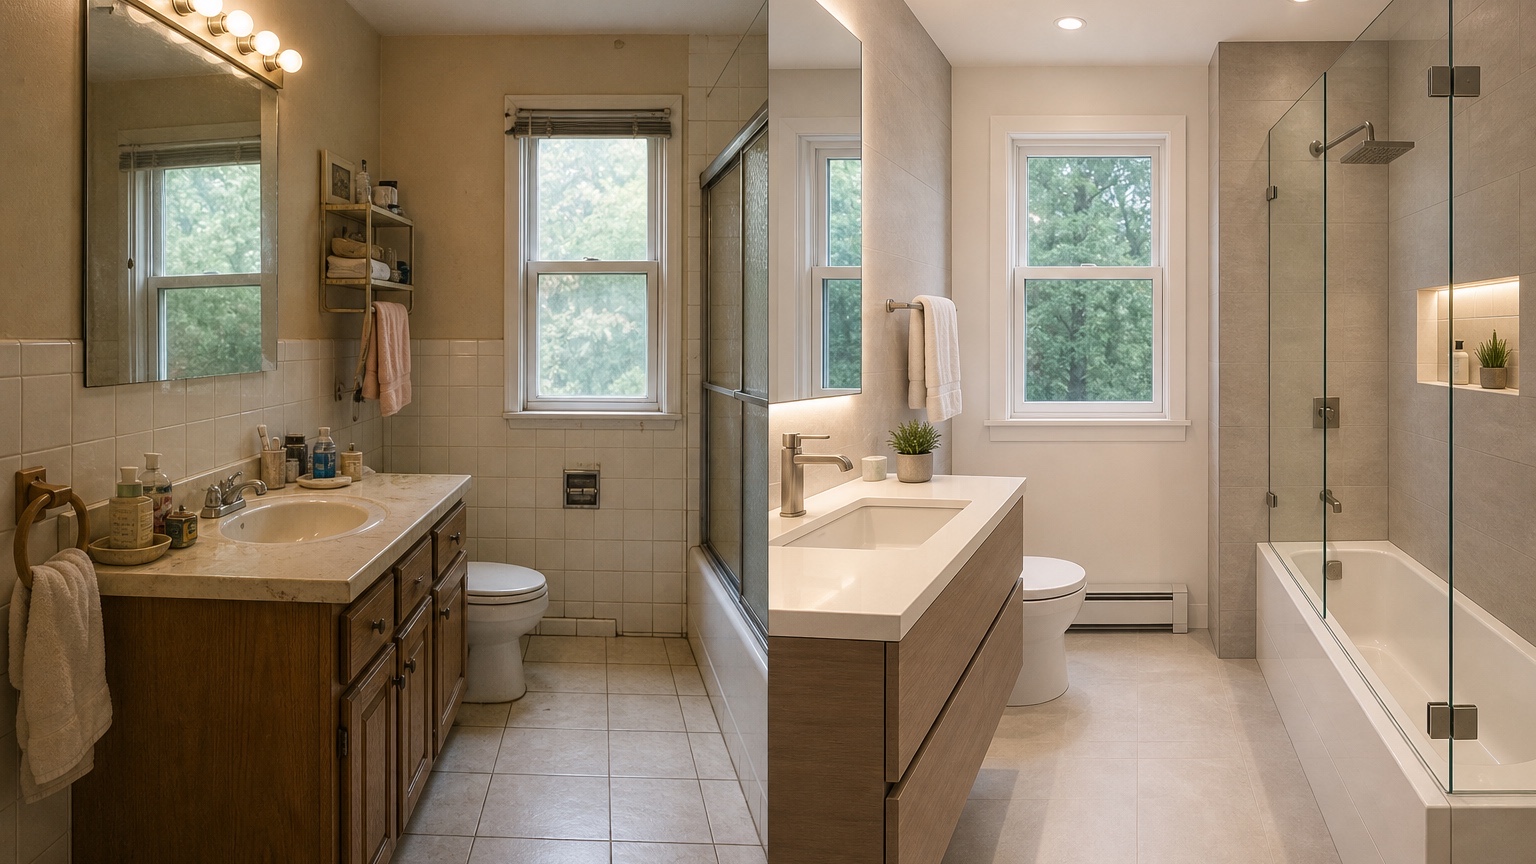
After a few rounds, choose two or three directions and make a simple comparison sheet. Put the original photo on the left. Add the best tile-focused option, the best vanity-focused option, and the most budget-conscious option. Under each, note what changes: shower tile, floor tile, vanity, countertop, mirror, lights, fixtures, paint, and any layout assumption.
Then mark each item as “visual only,” “sample needed,” “measurement needed,” or “contractor review needed.” Tile pattern, color palette, and vanity style may be visual decisions. Vanity width, shower glass, fixture rough-ins, waterproofing, electrical changes, ventilation, and door clearance need professional review. This prevents a generated image from being mistaken for a construction plan.
Remodelers can use the sheet to speed up client conversations. Instead of debating abstract words like “spa-like” or “timeless,” the client can point to the warmer tile, the quieter grout, the lighter vanity, or the fixture finish they prefer. Homeowners can use it before showroom visits so they are not overwhelmed by hundreds of samples.
Prompt recipes for bathroom remodel decisions
For a tile-only round: “Use this bathroom photo for a realistic remodel preview. Preserve the layout, vanity, toilet, window, ceiling, mirror, and lighting locations. Change only the shower wall tile to matte off-white vertical stacked tile with subtle grout, and change the floor to warm light stone-look porcelain. Keep the room practical and do not add new windows or a larger shower.”
For a vanity refresh: “Keep the bathroom layout, floor tile, shower tile, toilet, door, and window unchanged. Replace the vanity with a same-width warm white shaker vanity, white countertop, simple chrome faucet, rectangular mirror, and improved warm mirror lighting. Keep storage practical and do not move plumbing.”
For a full finish comparison without layout changes: “Preview a no-layout-change bathroom remodel from this photo. Preserve plumbing locations, room size, door swing, window, and ceiling height. Show a warm oak vanity, limestone-look floor tile, off-white shower tile, brushed nickel fixtures, soft warm white walls, and clear realistic lighting. Avoid luxury features that require moving walls.”
For using a reference image: “Use the reference image only for tile color, vanity warmth, and fixture mood. Apply that direction to the uploaded bathroom while preserving its layout, door, window, toilet, shower location, and room dimensions.” Reference images are most useful when they guide finish language rather than replacing the bathroom you actually have.
Where RedesAIgn fits before the remodel begins
Use RedesAIgn while the project is still flexible enough to compare. Upload the best bathroom photo, write a constraint-heavy prompt, save the wording that keeps the room stable, and remix one major category at a time. The 10 AI editors, prompts, reference images, saved prompts, and history are most valuable when you are narrowing choices rather than chasing a single perfect render.
The 5 free credits with no credit card are enough to test a small set of directions. If a homeowner, spouse, client, or contractor discussion needs more views, one-time credit packs let you continue without a subscription. The payoff is practical: fewer random samples, better showroom visits, clearer remodel conversations, and a lower chance of ordering a finish that never belonged in the room.
FAQ: AI bathroom remodel visualizer
What is an AI bathroom remodel visualizer?
An AI bathroom remodel visualizer uses a real bathroom photo and written prompt to preview tile, vanity, lighting, fixtures, paint, and remodel style options before materials are purchased or work begins.
Can it replace a contractor, designer, or tile installer?
No. It can help compare visual directions, but it does not verify waterproofing, code, plumbing, electrical work, ventilation, product dimensions, slip ratings, or installation details. Use it alongside samples, measurements, and professional review.
How do I get more realistic bathroom remodel images?
Use a clear photo, name fixed plumbing and layout constraints, avoid asking for structural changes unless they are truly planned, and remix one decision at a time: tile first, then vanity, lighting, fixtures, and paint.